
At some point in developer’s work, you might probably need to cooperate with your designer. Let’s make it clear: good design is always welcome. We all don’t like creating ugly apps.
So you have a designer who provided a client with beautiful designs. So far, so good. But now, you need to implement those designs. Shit. Depending on their complexity it might be a nightmare or a daydream. Your life is hands of the designer.
Coming back to the main topic: you have the designs which you need to implement. Your designer (hopefully) did them in Sketch or Adobe XD. For the purpose of this article, let’s say he/she did it in Sketch. By now, the Sketch file should be ready. What now? You need to measure margins and paddings, export icons for Android & iOS, check texts’ font etc. – you just need to implement the UI. In order to do it, either your designer needs to provide you that information or he/she can share the design via eg. InVission or the sketch file can be shared. Let’s make it clear, that first solution is not an option, as it requires too much time and effort.
InVission
This is one option. It’s great! As it might be clickable, it might have animations etc., I think it’s the best option when sending mockups/designs to the client for the approval. InVission also has “inspect” mode. You can measure everything, take colours, check fonts, export assets etc.
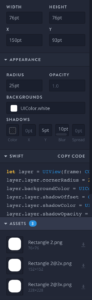
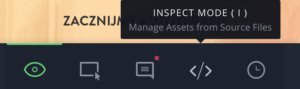
In order to open the inspect mode: open InVission -> select project -> open chosen view -> either press I or click </> on the bottom bar.
Exporting assets from InVission
From my experience, exporting assets can be pretty painful. Firstly, sometimes the assets you need are not marked in Sketch as exportable, so you won’t be able to export them (screenshot). So in order to change it, you need to contact the designer, ask him/her politely to make a new version of the design & update the InVission. Although this process is simple, sometimes it is impossible because you can’t contact the designer.
Secondly, in order to export assets for Android & iOS at the same time, they need to be marked as following.
But hey, the designer doesn’t know that you will need 8 dimensions of one asset, so probably he will make it exportable for iOS only. It is your job to take care of the export – either do it by yourself or be sure that the designer will do it.
As written above, you have to work closely with your designer. But as written before, sometimes it is not an option as the designs are already finished and provided.
So let’s say you ended up with the designs uploaded to InVission are assets are only exportable for iOS. Here is the sad thing, I haven’t found a way how to make an asset exportable for both Android & iOS… Mostly my workflow was like:
- export the asset for iOS in 1x, 2x, 3x,
- open Android Studio,
- create needed Android assets from the previously exported @3x file (as it is the biggest one, all assets for Android should be created),
- close Android Studio,
- open File browser,
- copy already created Android resources into my Android project,
- copy assets created in point no. 1 into my iOS project,
- open Visual Studio,
- add the added assets to my solution.
Of course, instead of using the Android Studio you can use any website that can do it. But still, it takes time.
Both ways, it is pretty complicated. I’d like to get rid of manually generating Android files. I’d like to get rid of the points from 1-4. I’d like the InVission to do that for me. Maybe it can? Right now, I haven’t found a way how to do it.
Sketch file
To start with, this approach requires Sketch on your computer, so it is not suitable for people on Windows/Linux and for those not having Sketch license (or already having their’s trial expired). In this approach, you should be having the raw sketch file. Sometimes it is possible, sometimes it is not (remember? You should be in touch with the designer).
Following this path has one disadvantage – by default sketch only supports exporting assets for iOS. But don’t worry, you can easily extend it so it can export those for Android too.
Exporting android assets.
In order to do it, you need to add the plugin which allows exporting asset for Android. In order to do it:
- open this Github repository,
- download it,
- unzip the downloaded file.
Now, open Sketch, we need to install this plugin.
- Open Sketch
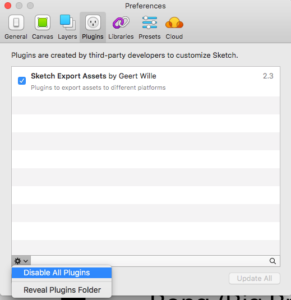
- go to Plugins & open Manage plugins,
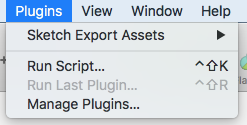
- on the opened view click Settings icon & click Reveal Plugins Folder.
You should end up with opened Finder. Now, simply copy the folder with the .sketchplugin extension to the opened folder. Voila. Done. One more time open Sketch and now your extension should be visible. Easy? It is said that this can be also achieved with Sketch Toolbox, but I haven’t managed to do it, as Toolbox on my computer crashes at start.
Ok, so having the plugin installed:
- Select the asset you want to export.
- In the right bottom corner, you should have the drop-down. Open it.
- In here you should have the possibility to choose the Android. If yes – click it. It should autogenerate the mdpi, hdpi, xhdpi etc. files
So now you can export both iOS and Android. That’s good!
But for me, it was still not enough. I wanted to export the asset for Android & iOS with a single click. So I did it. If you want to have the same to as following:
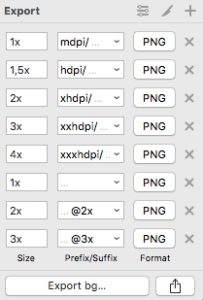
- Click Export & select the filter icon (top right corner). The following menu should appear (or similar).
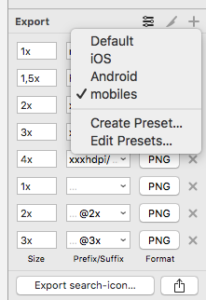
Click Create Preset… What is worth mentioning is that here I have 4 presets: Default one, for iOS (1x, @2x, @3x), Android (the plugin I’ve described earlier) & mobiles (which is both iOS & Android)
- Now, after clicking Create this should appear
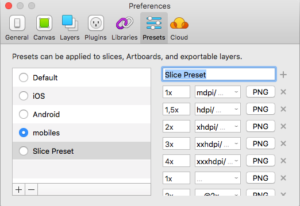
- Click + in the bottom left corner, type the name of your preset and add the needed size. You can either copy them from Android & iOS preset (if you installed the plugin) or copy it from the image above.
That’s all. Voilà, now you can export both iOS & Android with a single click.
Working with the design
Either you are the developer or the designer – it doesn’t matter. Simply when sending/receiving the design file check the following:
- What is the size of the artboard/page/view/whatever-we-call-it? Is the design done for iPhone 7, 8+ or SE? Or maybe the design is done for Android? This is important when measuring items. Also, keep in mind that some designs might not look good on smaller/bigger phones. Always stay in touch with your designer/developer so you know what should be the final result,
- Check if there are platform specific controls. Personally, I hate implementing bottom TabBar on Android – I strongly believe that is should be on top & iOS’ should stay at the bottom! Consistency sometimes is not that good!
- Check if the items are properly grouped so it is easy to understand what’s going on.
- Expanding the previous point: check if the names of the assets/groups are easy to understand. Sometimes it is hard to know what is “Group 4” or “Symbol 7”.
- Check if the images are cut to the proper size. To visualize it: I see the design with the square image in it. I export the image. The exported image is not a square. Ech. Just don’t do this.
- Check what font is being used. If it is custom one: request the .ttf files as you will need it.
And always remember: the designer/developer is not your enemy! You are playing on the same team, so don’t fight, be polite and co-operate!
Hope this post helped you in your daily development. As in always: if you have any questions feel free to contact me!
feature image from: https://pixabay.com/en/whatsapp-interface-apps-android-1660652/