Header image taken from: bitrise.io
Long time no writing. Sorry, not so sorry. But here we are. In this post, I am going to write about CI/CD. The title doesn’t say it, but this will be in a form of another logbook so I can later come back to it. I really hope that someone will find this useful — I really believe that my workflow is not that unusual.
But let’s start with a short history.
At some point in my life, when I was hearing CI (continues integration) or CD (continues deployment) I was struggling with disguise. Why? Because in a company I was working for, on several team meetings, senior developers were discussing which CI/CD should they use. This topic implicated the quarrel: if we want to have a CI/CD we should not use Bitbucket repo. We should use GitLab. Another developer told, “GitLab sucks, let’s use GitHub”. And the fight began. After a few meetings, we were still using Bitbucket and nothing was done with CI/CD. Mostly, because we couldn’t have agreed on which repo to choose. Great! After some time, those developers left. I was on my own, having the repo on Bitbucket and without CI. And people were asking: are you using CI? Which one do you use? Why do you use it? etc. I was frustrated. I decided, that as everyone (who was capable of integrating) is gone, I should do it on my own. So I started digging. In my side project (done in Android native) we were using Bitrise, so the choice was quite clear. Bitrise it is.
At that moment, I was working on an app in Xamarin.Forms. Both iOS and Android were supported, so I wanted CI to build both platforms. A little worried, I did the research if Bitrise is a good choice. I found great articles (links at the end of this article — I suggest you read them!) about it & it happened that James Montemagno did an awesome video about it! After reading and watching, I took a piece of paper and planned my workflow. This helped me with understanding what steps I am taking to deploy the app & what should the CI cover. So here is what I’ve found out:
-
- I run the Unit tests to check if anything is still ok
-
- If the tests are passed, I increase both the iOS and Android version
-
- Time to archive & sign the version
-
- If the versions are ok, I upload them to Fabric (I believe that Fabric sucks on Xamarin, but my company is using it for Native projects, so I have to stick with it — maybe I’ll write about it in the future)
- When the version is uploaded, I notify clients about it.
Having this on a paper, I planned how the CI process should look like. At this point, I was thinking “how it should look on a computer with Visual Studio only?”. Here is what I’ve come up with:
-
- Clone the repo
Quiet obvious one. How can you archive the code if you are not having it?
- Clone the repo
-
- Set the certificates
If you want to archive the version for Android & iOS you should have both certificates and provisioning profile for iOS. Still an obvious one.
- Set the certificates
-
- Run the UI/Unit tests.
Depending on what you have in your projects, for sure you want to run them to see if they are passed. As I am still missing the UI tests, I just wanted to run my Unit Tests.
- Run the UI/Unit tests.
-
- Build and archive the versions
As written above, I want to make two archives: iOS & Android, so let’s do it!
- Build and archive the versions
-
- Upload the archives to Fabric
… or any other distribution channel you are using, so the clients can download and test them - Notify if the build was a success or not
As we are using Slack in the company, I wanted to receive a message on a #build channel saying if the build was a success or not. If it was, I’d like to receive a link to a new version.
- Upload the archives to Fabric
And it got complicated. On a paper, it was looking good but now we need to integrate it on Bitrise. Damn. But I must say it is not that hard as it is looking. Let’s take a look.
Set up Bitrise account
I won’t tell much about this point. Right now (mid-2018) the registration process is very simple. You are a developer, so I believe you can do it. I can only add, that I chose to log in with Bitbucket account.
Add new app
In this step, Bitrise will guide you. You should not have a problem. What is worth mentioning is the fact you’d better be a repo admin. Let’s go step by step.
- choose the account connected you want to use

- choose the repo to which you want to add a CI
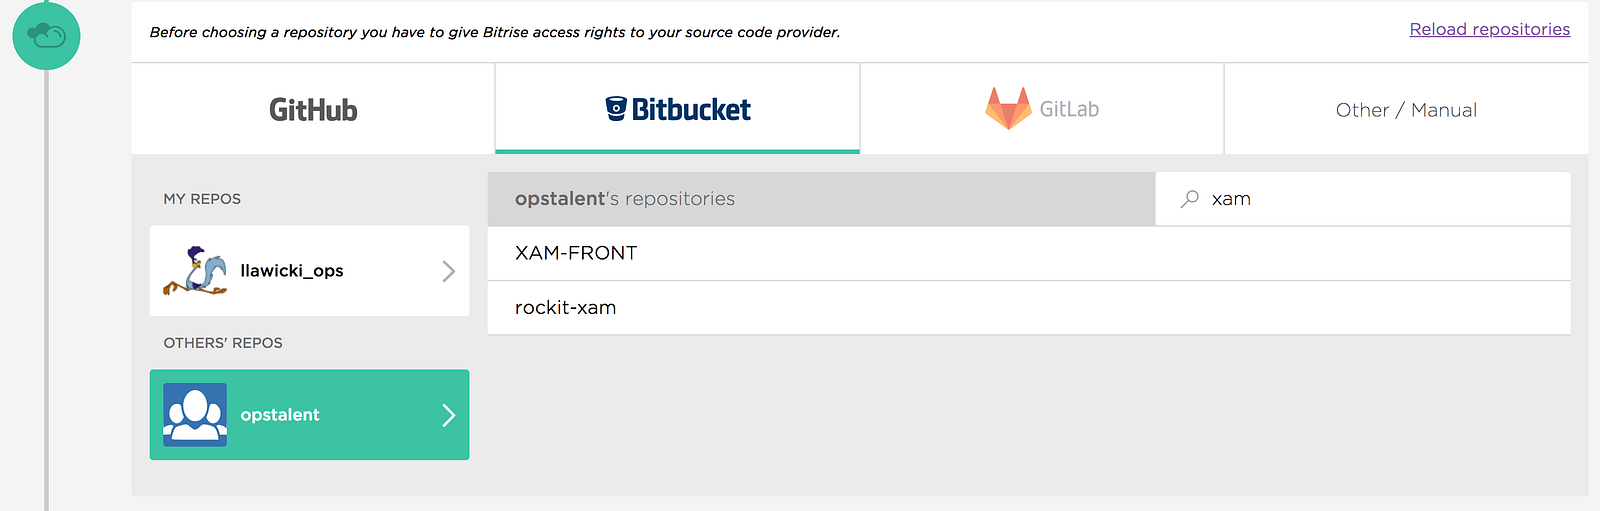
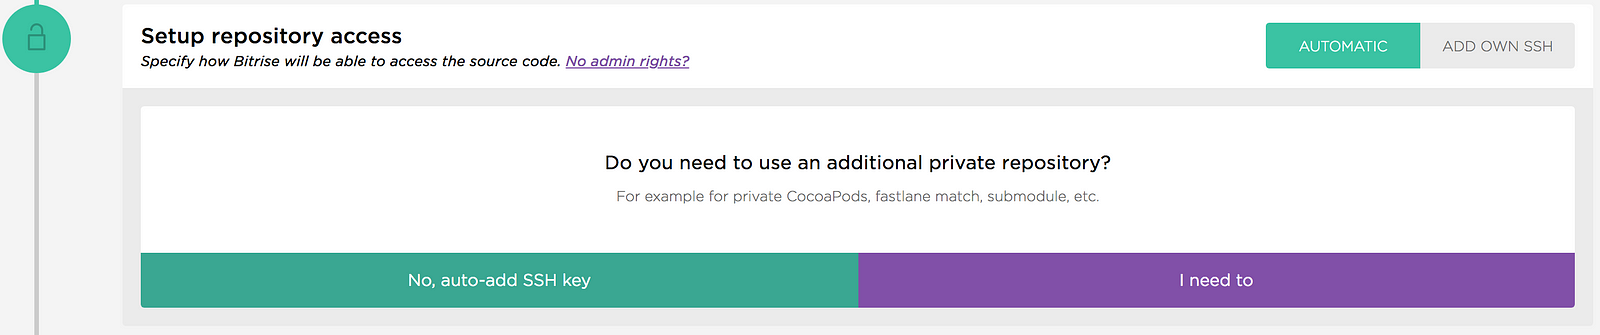
- decide whether you need to add additional private repo — I don’t use one so I clicked “No, auto add SSH key”
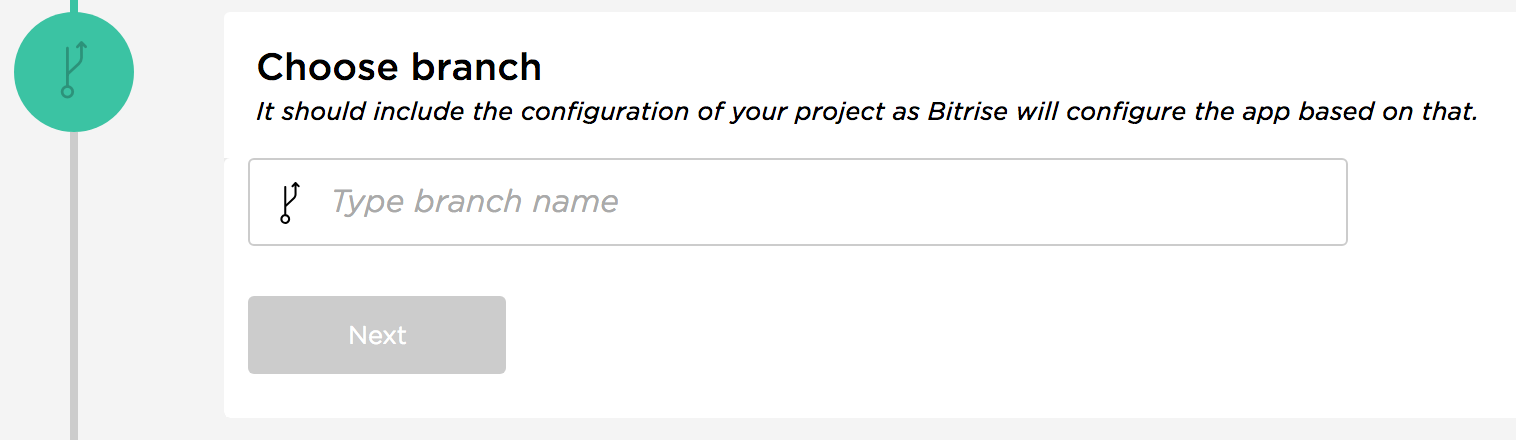
- type the name of the branch you want to use — I was thinking between master or dev, but finally chose dev — production builds are not so often, so I can either connect new CI in the future or build them manually
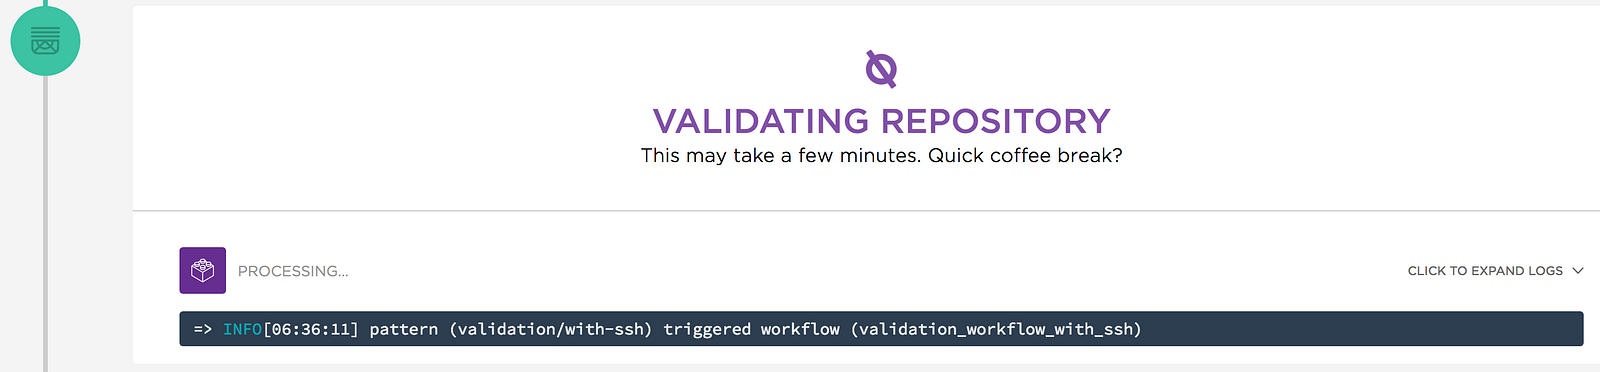
- wait for Bitrise to configure your project
It should auto-detect it is a Xamarin project.
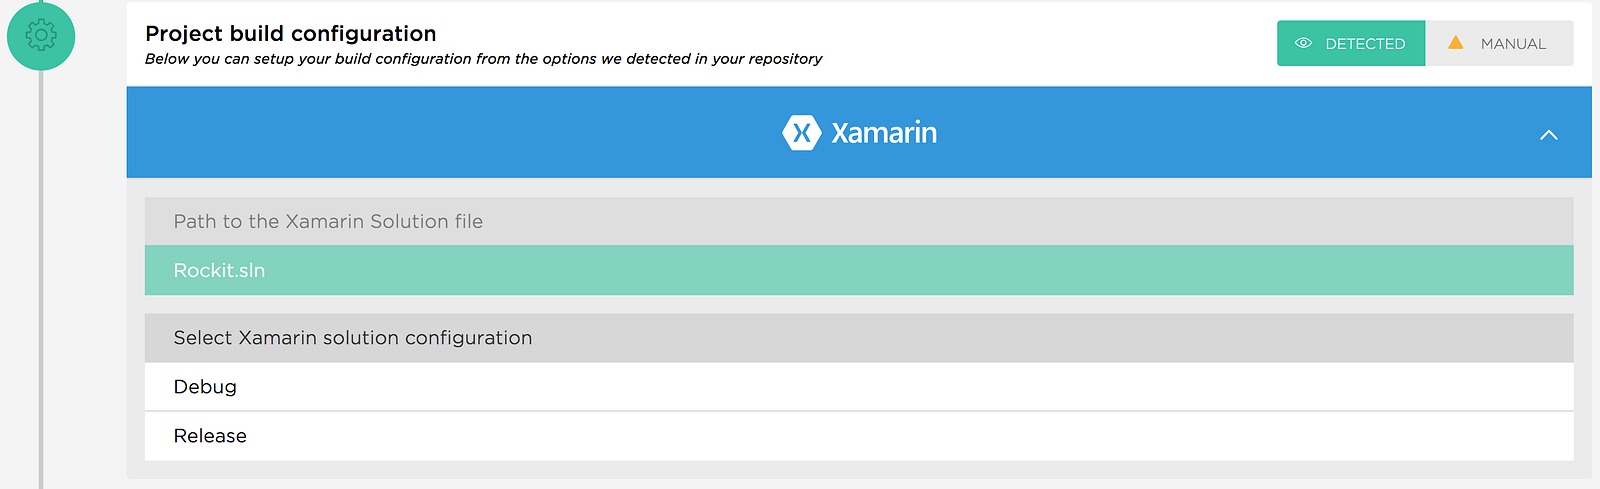
What you need to fill is the build type: either debug or release. After clicking on it, you will be asked to Select configuration. The answer is “Any CPU”
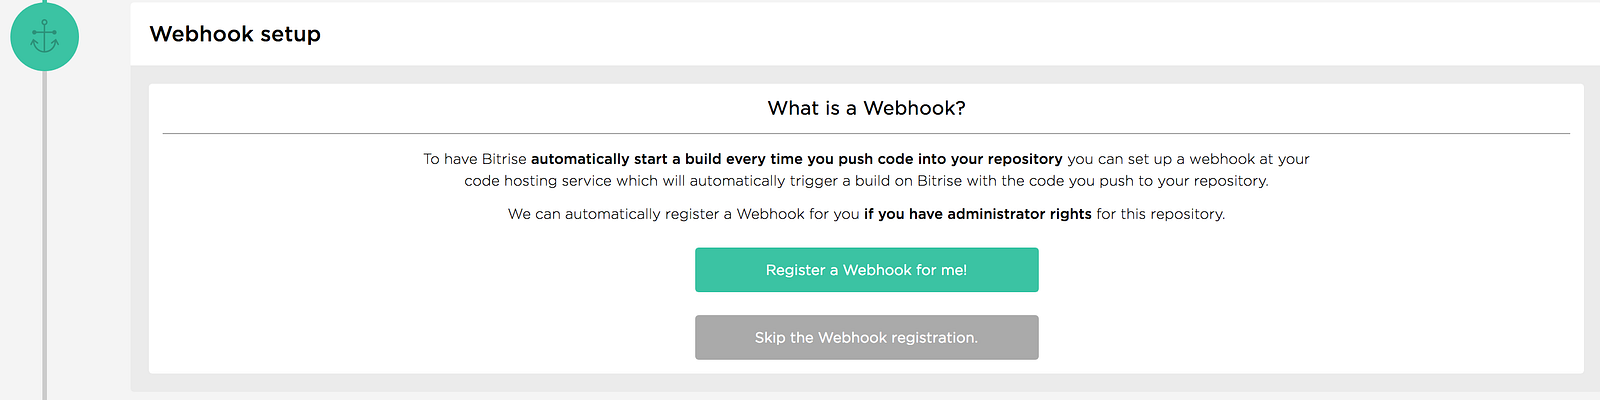
- if you repo allows you to have a webhook, you can create one. If not, sorry but you’ll have to run the builds manually (login to Bitrise and click Build)
Right now, you should have everything done.
Now, let’s take a quick tour through tabs
-
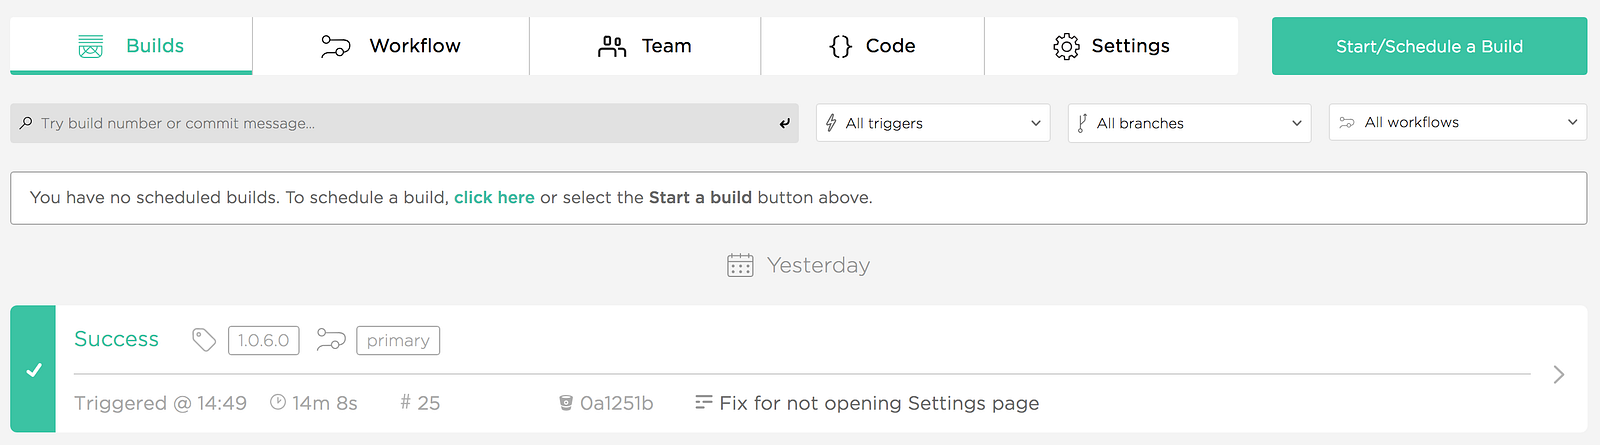
- In “Builds” you can either start or schedule a build manually and see the list of all previous builds. Nothing complicated to be honest.
-
- In “Team“, you can invite whoever you want to this project and give them permissions. That is nice.
- But the heart of Bitrise is the “Workflow”.

-
- In “Workflows” you will be defining your flow/s.
-
- In the “Code Signing” you should upload your app certificates (iOS & Android).
-
- In “Secrets” you can define the secret variables that won’t be visible in Bitrise.yml
-
- In “Env Vars” you can define your custom variables.
- In “Triggers” you can specify the triggers that will run your CI. I will describe it later.
Being honest, for now, I am not feeling like I should use Secrets or “Env vars”, so what interests me is the “Workflows”, “Code Signing” & “Triggers”.
Default Bitrise workflow for Xamarin
What do you think: if you run the build now, will it succeed? The answer is no. Let’s take look why.
In order to do it, go to your app and click “Workflow”. You should see something like this
Let’s go through each step & modify then so the build is a success.
-
- Activate SSH key
In this step, we are setting the keys so we can use the repo
An additional step that I didn’t realize is needed.
- Activate SSH key
-
- Git Clone Repository
Perfectly fine and obvious one.
- Git Clone Repository
-
- Do everything with the Script step
You can write your script and run it in this step. Nice!
- Do everything with the Script step
-
- Certificate and profile installer
As I’ve said: “Install certificates”. This is the first thing that will fail if you are building iOS. By now, you don’t have anything installed. In order to do it go to “Code signing” and upload everything, your project needs. Of course, provide the passwords after all! Shouldn’t be that hard. Go back to your workflow & let’s proceed.
- Certificate and profile installer
-
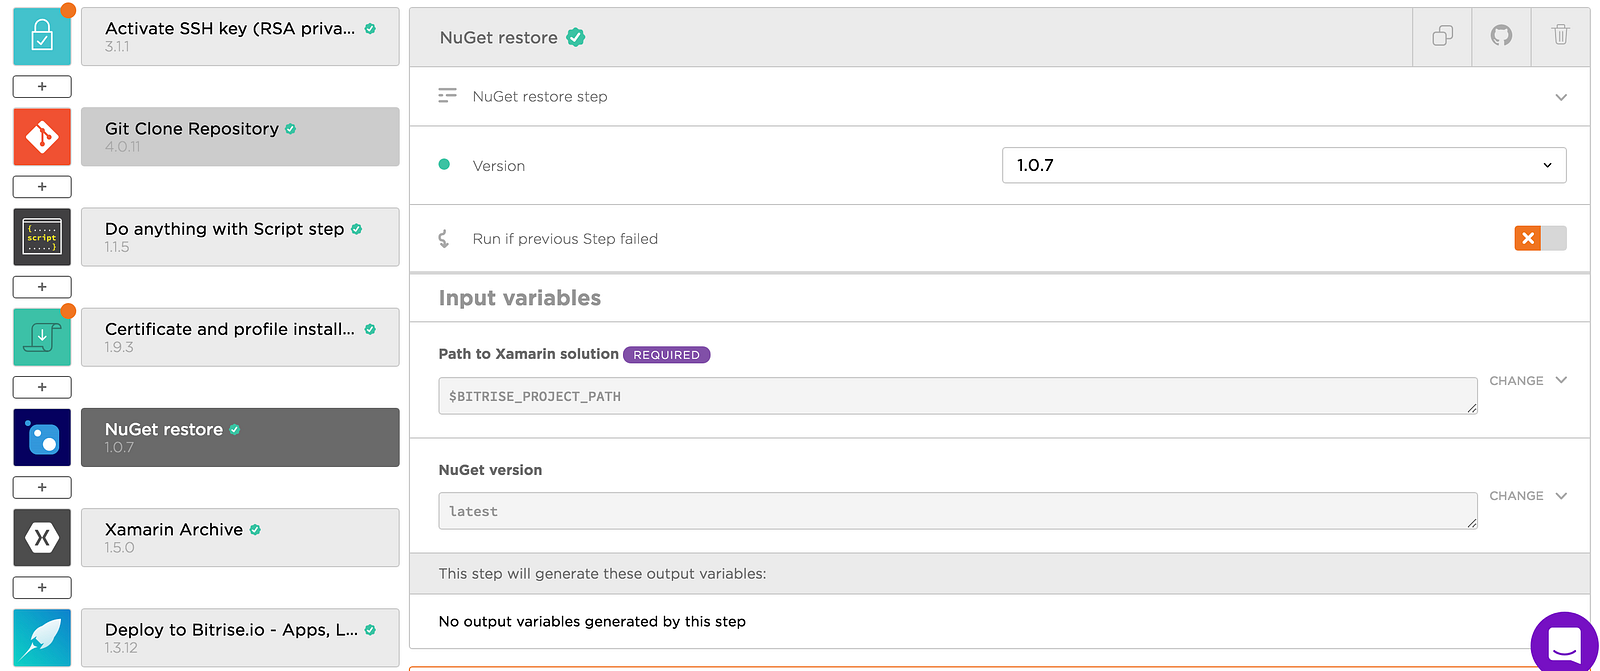
- Nuget restore
I’ve forgotten about it either. But thanks for including it Bitrise!
- Nuget restore
- Later we have “archive”.
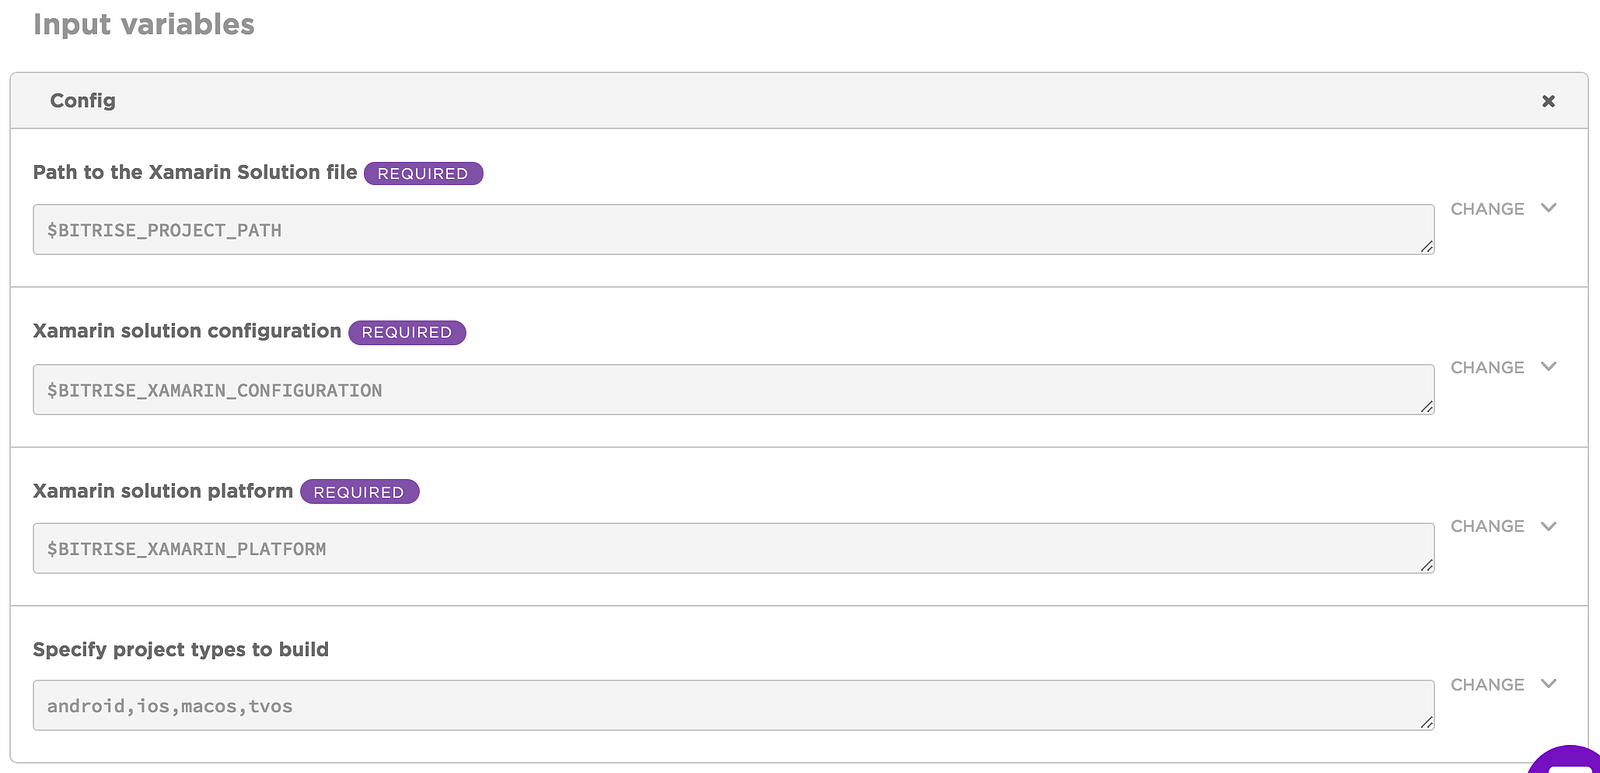
Probably, this step will fail too. Go on & check why. See? In the “Specify project types to build” we are saying that we want to build each of the written one. As long as you don’t build apps for everything, modify it according to your requirements. In my case just Android and iOS.
- Deploy to Bitrise.io
For now, it is ok. Let’s don’t mess up with it.
Having modified it, go back to your project and click Start/Schedule Build. If you filled all the data correctly it should be a “Success”.
What is worth mentioning is that you can decide if you want to step to be taken when a previous step failed. See? That tiny, orange toggle button in the image above 😇
But hey! I wanted to run Unit tests, bump the versions, notify me on Slack. Also, I wanted it to be run automatically! No problem, let’s proceed.
Create trigger
This is the first important step you should think of. When do you want to start a build? After push? Pull request? Tag? Or maybe every night? In order to create one, you need to go to the triggers tab.

Choose whatever suits you and “Add a trigger”. By default, your project should be run after each push. It’s up to you if you want to change it. Also, what is worth mentioning is the fact that you can use different workflows for different actions. So for PRs or pushes you can run tests, for tags archive version etc. — this is how I am doing it 😉
If you want to run your CI on schedule:
-
- go to the page where you can start a build manually
-
- click Start/Schedule a build
- toggle “Schedule this build” & do what you want.
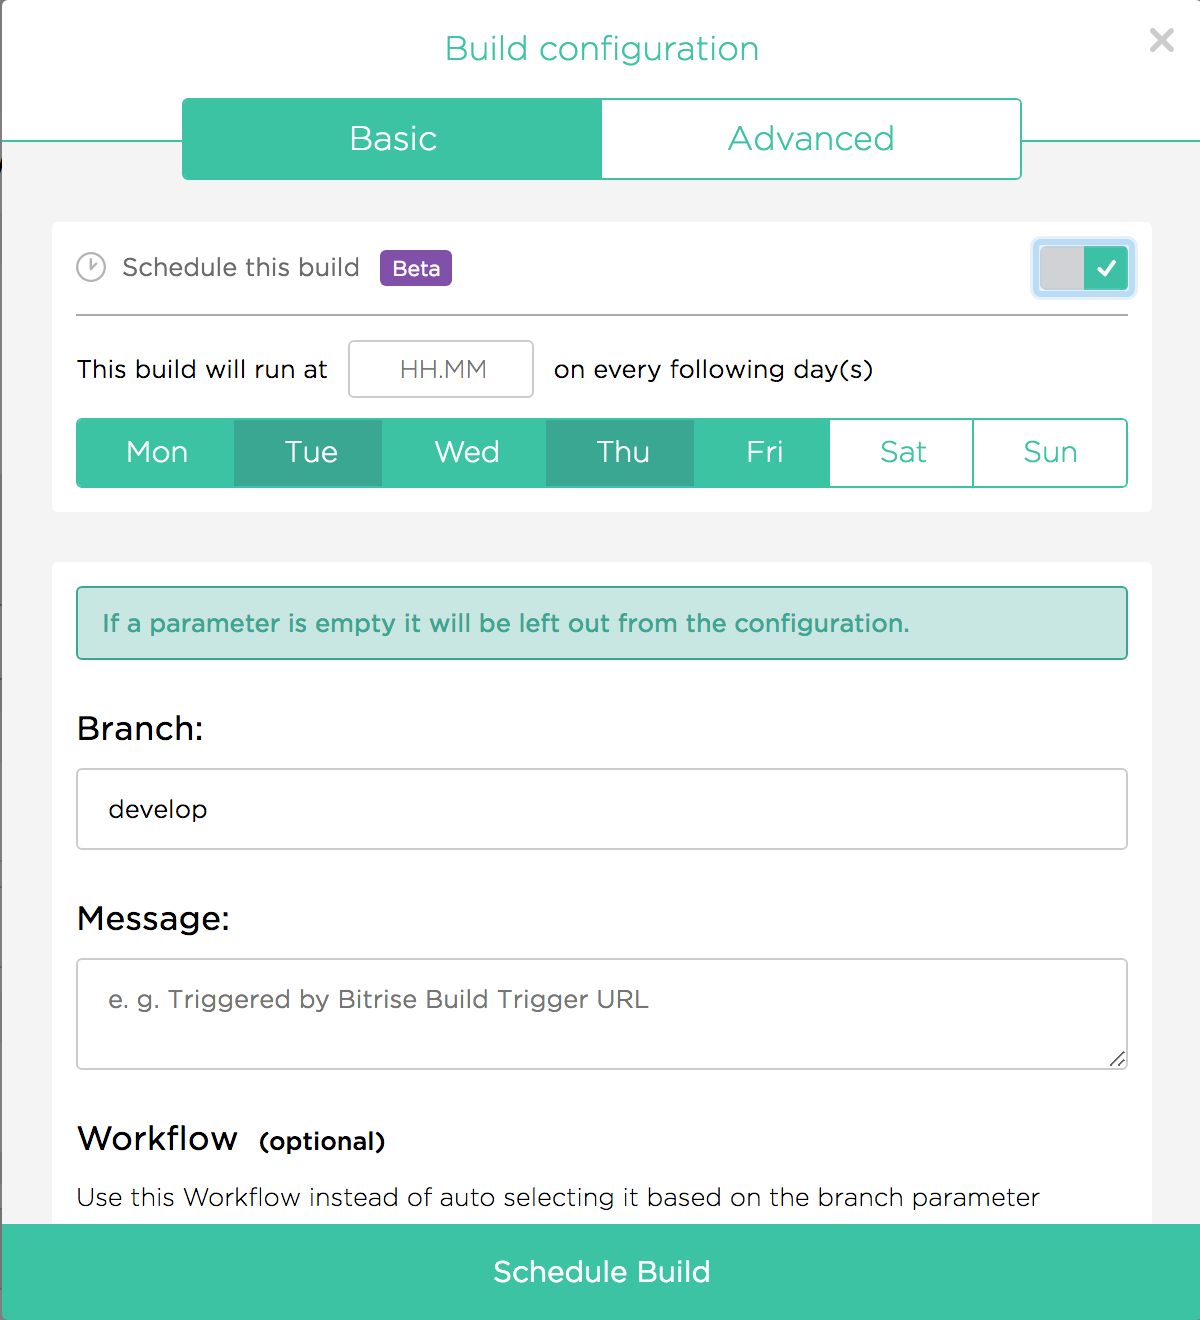
Choose days, hours, branch, workflow and you are ready to go.
Run the Unit tests.
We want to run the tests between making the version. If the tests fail we obviously don’t want to archive. So we need to add NUnit runner, click + button between Xamarin Archive and Nuget restore. In the pop-up search for NUnit runner.
Add it. In its configuration, there is not much. What is worth noticing is the field “Build before test”. If in the previous step you built the project there is no need to rebuild it. Voila, running unit tests done! Build the project to see if the build succeeds.
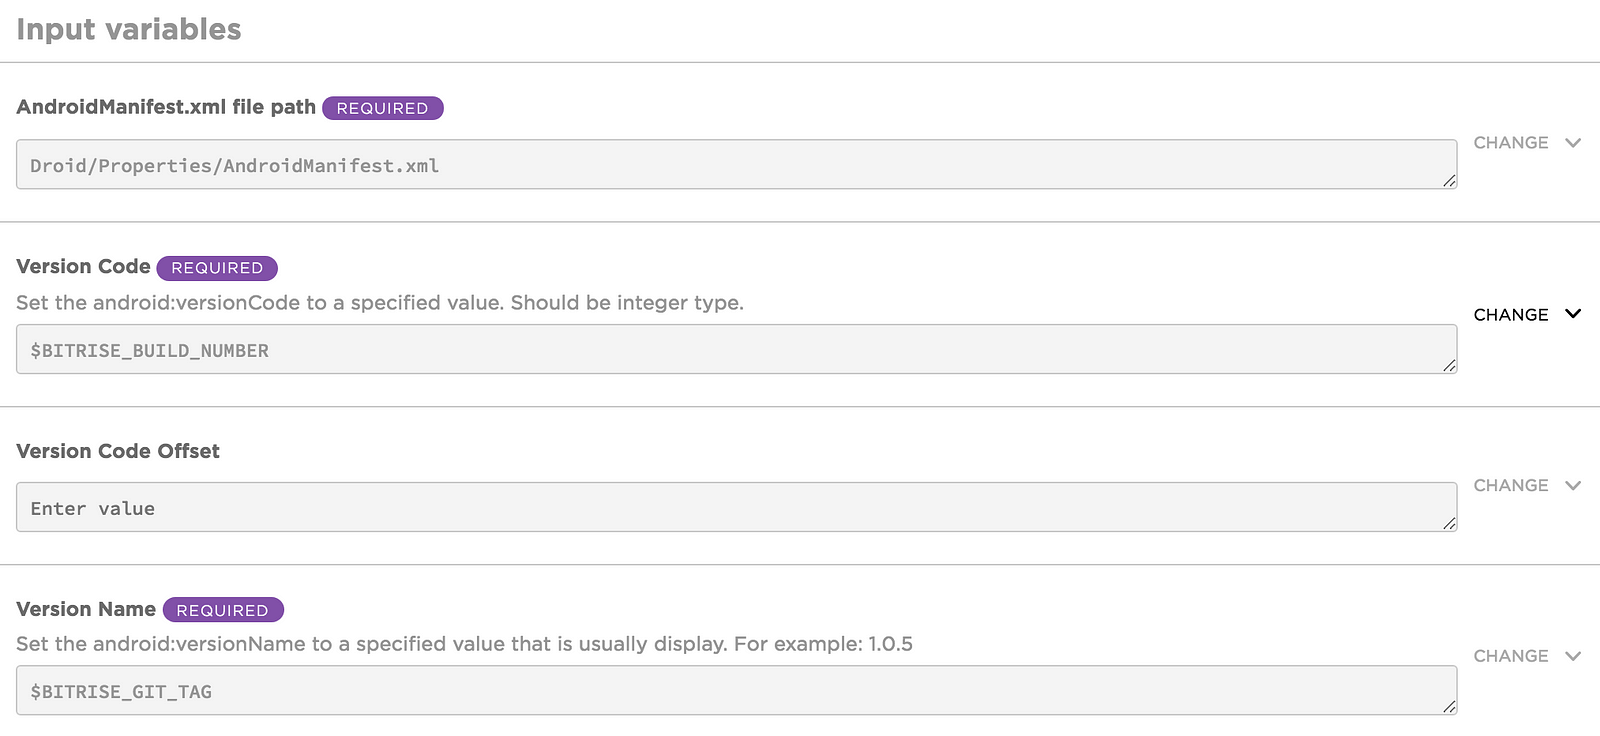
Bump Android version
We need to add another step. You might need to add this between tests and archive. Thanks to James Montemagno there is one easily configurable step. Click + and search for “Set Android Manifest Version Code and Name”. What you need to configure in here is:
-
- AndroidManifest.xml file path
The obvious one. Probably something like this Droid/Properties/AndroidManifest.xml
- AndroidManifest.xml file path
-
- Version Code
The code you want to be built. I thought that if I am creating a CI it will be nice to have a build number. - Version Name
This one is tricky. Firstly, it looks like it is not required. If you leave it empty it will take the original value from the original manifest. But in my scenario, I am tagging the commit and the tag starts the build. So let’s take a tag value.
- Version Code
In my case, it’s looking like this:
Now, let’s move to Info.plist
Bump iOS version
Let’s add a step “Set iOS Info.plist Values (unified)”. Configure it. For sure fill the data: “Info.plist file path”, “Bundle Version to set”, “Bundle Short Version to set”. Only the first one is needed, but it’s ok to fill the rest so you won’t have a chaos in your archives. In my case, similar to Android, I used “$BITRISE_BUILD_NUMBER” & “$BITRISE_GIT_TAG” for versioning.
Build the project again and see if it works!
Slack integration
What is left is the notification on a Slack. If you want one, add a step “Send a Slack message” and follow these instructions.
I might add, that before sending a Slack message I am creating the QR code with the installation link, so I can scan it and download the app (in order to do it add a step “Create install page QR code”.
When you are done! Build and see how it works!
As you can see I didn’t deploy the app to Fabric. The reason why this happened is that currently Fabric is only supported on iOS. Also, I am currently working on InApp payments, so I need to deploy the app to TestFlight and Alpha channel on Google Play store. As I don’t have time to do the research on how to do it, I am using Bitrise.io to deploy the app. Hopefully, in the near future, I will write another blog post on how to it.
For sure, if you are interested in integrating it, read the articles from references & watch live coding from James!
Conclusion
At first, I was really afraid of integrating CI on Xamarin.Forms. Mostly because of my colleagues. Maybe a little bit, because of shell scripts. Maybe. But Bitrise is the answer. I fell in love with it. It’s really easy to integrate it. It helps in the development. It’s awesome! Love you Bitrise! Love you Xamarin!