If you are developing Xamarin.Forms apps, then you probably know, that after some time you are having plenty of stuff to add when starting a new project.
You need to add your favourite base classes, custom controls, renderers, extensions etc. It takes almost half
of a day to add everything. Later, when starting a new project you need to do it once again. And once again
when another project starts. And one more time when another starts etc. What if I tell, you can save that
time and still use those features? What if I tell you that creating your own NuGet package is very easy?
The aim of this article is to create the .NET standard Nuget package, so we can use it across our projects.
For the purpose of this post, let’s create GradientView and BaseViewModel class. GradientView will be control with a gradient background, and BaseViewModel will be our abstract ViewModel holding our basic properties like Title and IsBusy, etc..
The recipe is quite simple.
As in the title, we want the package to use .NET standard. So:
-
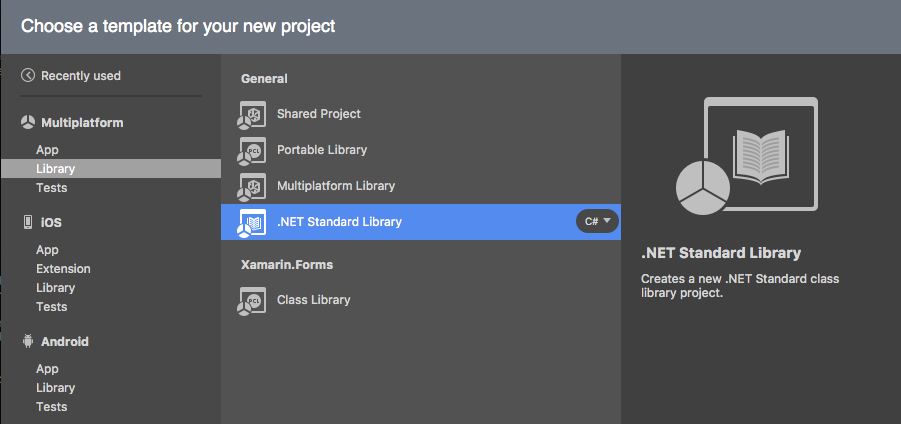
- Firstly, we need to create a .NET standard library. Your .NET standard library should target… just check
this list what is the most suitable version for you. By now, you should have only one project in your solution.
- Firstly, we need to create a .NET standard library. Your .NET standard library should target… just check
-
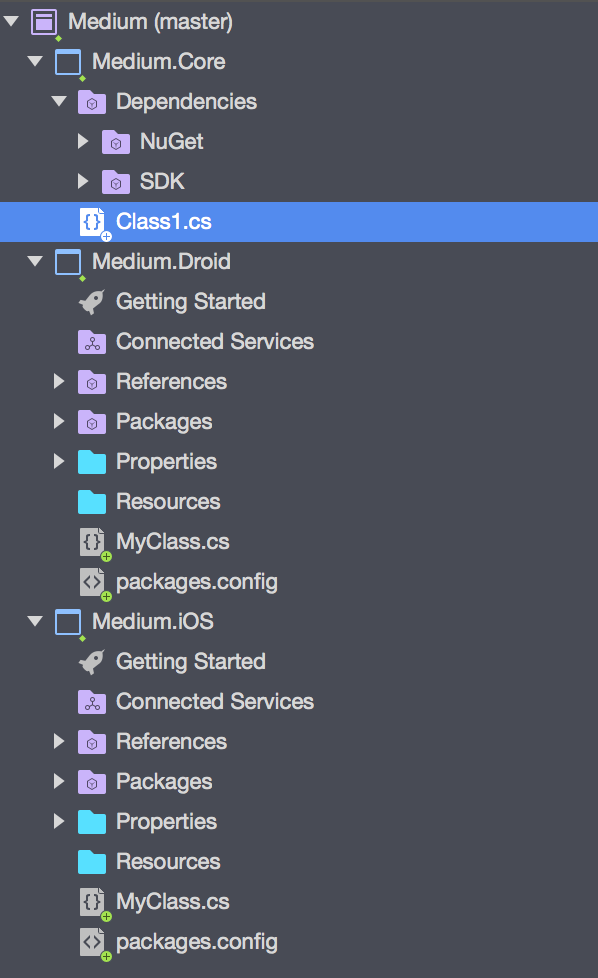
- Add Android Library project to the existing solution,
- Add iOS Library project. Same as in 2nd point.
You can find Library projects in here:
At this point, what is worth remembering is what you’ve typed in assembly name — you might want to remember
it as you will use it when using the control in a Xaml file:
![]()
See? We are providing assembly name in here
When you have a solution with 3 projects (or more if you want) add a reference to the previously created .NET standard project in both iOS and Android projects. Also, add Xamarin.Forms package to each project.
By now it should look like this.
Now, add whatever packages you want to use.
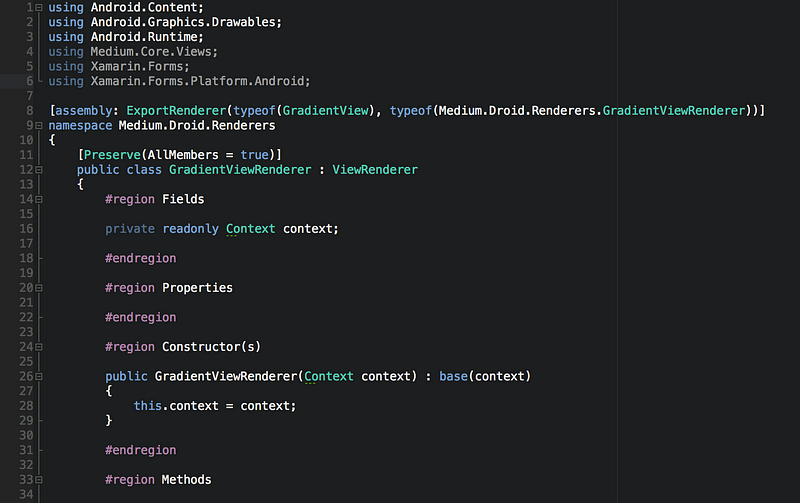
When you are done, write/copy the things you want to add to the package. I will simply add BaseViewModel class to my .NET standard project & GradientView with renderers. In renderers include the line [Preserve(AllMembers = true)] before declaring the class.
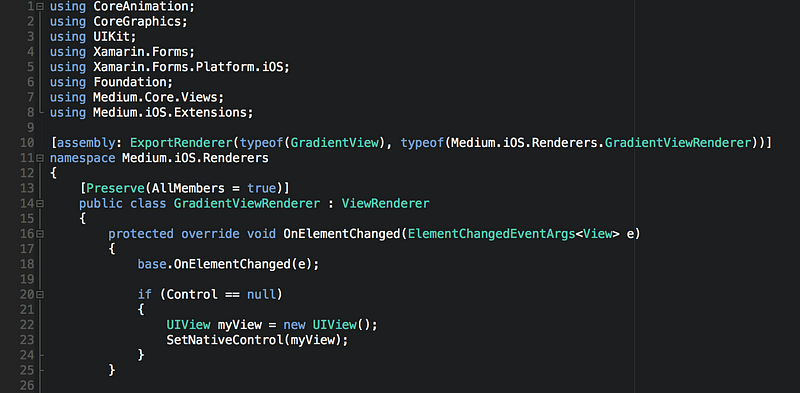
In the iOS project, do a similar thing.
Having the above, let’s start the fun part. Target the release in the top bar menu.

Having done that, build each project. You can do it by right-clicking on it and clicking build. After doing it,
check if the .dll files were created. You should have them under path similar to:
“/bin/release/your_project_name.dll”. These should exist in each of your projects. If you have them, continue.
If not, fix it!
By now you should have plenty of dll files. We will need 5 of them (1 for Core project, 2 for iOS, 2 for Android — in
platform specific folders you should have
YourNuget.Core.dll
and
YourNuget.iOS.dll).
Now, let’s
create the nuspec file in the root solution folder.
Name it something like
YOUR_SOLUTION_NAME.nuspec
As I was doing it on Mac, I simply copied other nuspec files from the downloaded project I had on my drive.
Now, open the nuspect file in your text editor. Something similar will appear:
Let’s go attribute by attribute.
id — just an id of you package. It is visible for the user. They can search for your package by id. They
can download it by id.
version — just a package version, nothing special in here. Also visible for users.
title — I’d rather say subtitle, as it is visible under the package name in the
nuget. A quick summary of the package
authors & owners — too obvious to explain. Figure it out by yourself 😉
licenseUrl — link to the license.
projectUrl — link to the GitHub or a website.
iconUrl — link to your thumbnail which will be visible when adding the nugget. It accepts icon 64×64
pixels.
requireLicenseAcceptance — this one is a bool. True or false. Sometimes, when you install the package
it is asking you to confirm the license agreement. Just legal stuff.
description — description of your package.
summary — just a summary of your nuget.
tags — tags everywhere… just tag the package.
dependencies —which packages are required to use the package.
releaseNotes — just release notes.
files — the heart of the nuspect file. Find below.
Files
Maybe we should describe it in here. As you can see, it contains 3 groups: Net Standard, Android and iOS (divided
by a xaml comment). What you need to understand is that this doesn’t mean many packages will be created! You
are just saying what do you want to be included in a package.
Each line contains
src and
target.
Src is a path to your .dll file, which you want to be included.
Target is saying that this dll should be treated like this type. When talking about Core project you
should target dll’s as .NET standard or PCL-111 or PCL-259 etc.
What is interesting is making a package for Android/iOS. Think about it as references. You want to use some
control from Xamarin.iOS. That’s perfect, but this control is having bindable properties in it! So you are
referencing both renderer and core project. That’s the same what is happening when making a package; eg. for
iOS you should reference both dll’s: iOS & Core.
That’s why in the first line you are saying:
Hey, let’s use Core
.dll as iOS/Android one!
then in the second line, you are saying
… and also, please include platform specific dll’s as I might want to use them.
You are just pointing to the core and platform-specific dll’s and telling
nuget to include them.
Based on the information above create your nuspec file.
Assuming you did it right, open the
Terminal and navigate to your solution root folder, and run
nuget pack YOUR_SOLUTION_NAME.nuspec
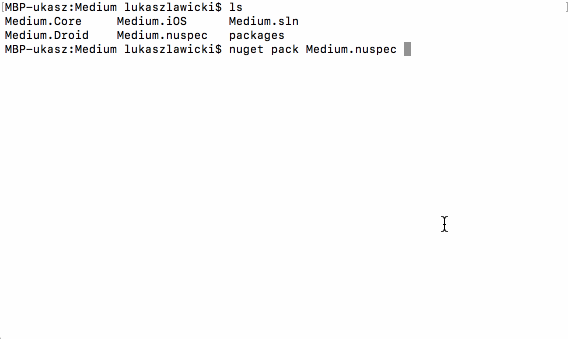
If you did everything ok, you should see information
“successful created packaged […]” and a package should be created.
Test if your package works!
Do it before publishing to nuget. At least, do it when you are making version 1.0.0!
In order to do this, createa sample project targeting the same .NET framework (or higher) as the package. If you don’t know how to do it follow this tutorial. When retargeting probably this error will appear.
Error Duplicate ‘EmbeddedResource’ items were included
But hey! Don’t panic! Open your main/root folder, open .csproj and delete the item group with the EmbeddedResource. Once you did it, run and check if it works. If it does then perfect, it not google how to fix it. For now, let’s assume everything is fine. Import your nuget.
On a Mac, in order to do it:
On a selected project open
add the package pop up. In the top left corner, there is a drop down saying
nuget.org
, click on it and select Configure sources. This should appear.
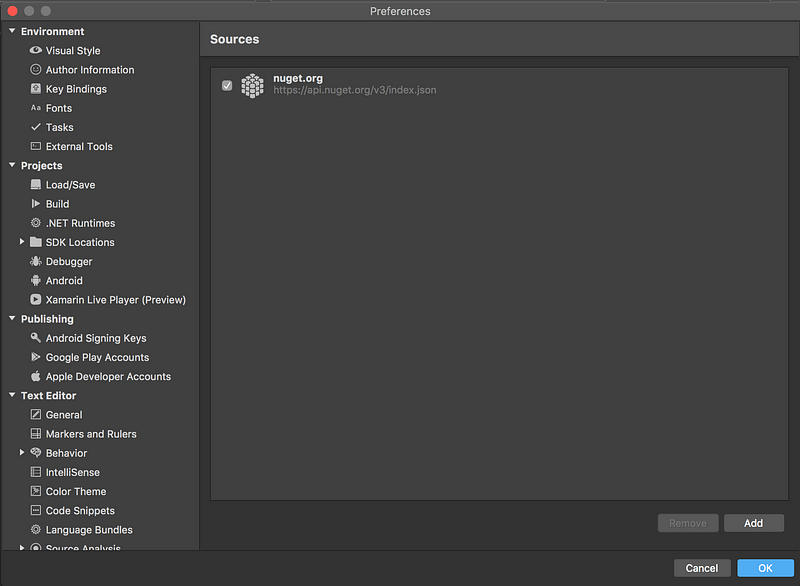
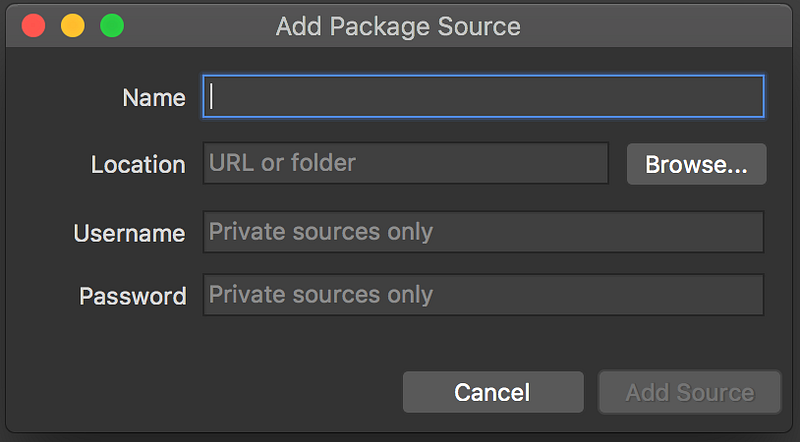
In the bottom right corner click Add. Another pop up will apear.
-
- Enter the name of your source (it will only appear in your Visual Studio, in my case it was simply
Medium).
- Enter the name of your source (it will only appear in your Visual Studio, in my case it was simply
- Select the path or enter the URL to the place where you wanna store all your nugets.
After you are done, click “Add source”. You should go back to “Add package” pop up with source changed to the
one previously created.
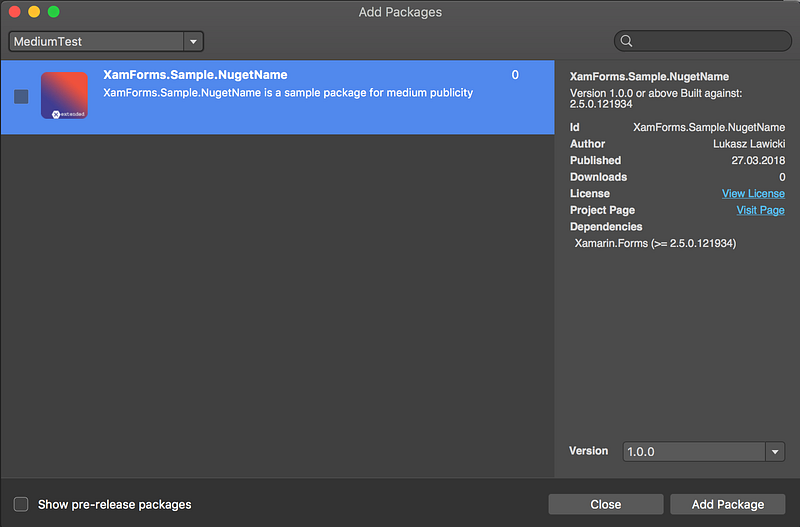
Now, choose your package and add it. Add it to all needed projects. After that, run the project and check if
it works!
If it works then publish!
-
- Go to
nuget.com. - Log in or sign up.
- On the top bar, you should have a button “update”.
- Click it.
- Drop the file.
- Check the information and publish!
- Go to
Within some time your package will be visible to you! In my case, it was visible in 30 minutes.
That’s all for now! If I missed something or something is unclear please let me know in comments!
If you liked this post, don’t forget to 👏!