“Do I really need static code analysis?” – that’s the question I was asking myself not that long ago. I decided that in spare time I will give it a try. So I did. I spent one evening to configure it & test how it works. I followed this instruction and after several minutes I was able to run SonarQube against my Xamarin.Forms project. I really liked the way that sonar was presenting the data: it was quite obvious where should I start. From that day I am using sonar almost every day.
What I didn’t like though, is the fact that Visual Studio for Mac is still missing SonarQube integration. In order to run the sonar, I had to open the terminal and run it from there. After all, I’ve decided to write a script that can run Sonar automatically. Later, when writing the previous article, I’ve found out, that it is possible to add “External Tool” to Visual Studio for Mac. So I’ve added SonarQube and now I can run it without living my IDE.
Update December 2018: This solution is not perfect. You need to download and unzip SonarQube Scanner on your own & you need to start sonar console within your terminal.
Step by step
Let me rewrite the instructions how to install sonar, so you can run it on your Mac.
1. Install brew
It’s pretty useful to have brew on your Mac. Expect from having sonar on it, I suggest you should take a look at git-extras (I will describe it in another blog post). In order to install brew, open your terminal and run:
ruby -e "$(curl -fsSL https://raw.github.com/Homebrew/homebrew/go/install)"
2. Install sonar
In the next step, you need to install sonar & sonar-scanner. You need to do it, so you can run code analysis against your projects. Now having brew installed, run the following commands in your terminal:
brew install sonar
brew install sonar-scanner
3. Start sonar in one of your terminals.
You will need to have 2 terminals opened to run the sonar. So do it. If you are withing terminal press Cmd + N to open a new window. Have it? I assume it was not that hard. Now, in one window run the command:
sonar console
It will start the sonar. To check if it is up and running try opening http://localhost:9000 in your web browser. When you open the page it should ask you to create the token. You can create one & save it. If it prompts for login and password, please use magic credentials that can open many doors: admin/admin.
4. Download sonar-runner – unzip it and remember the path where you have done that.
5. Scan the project
Now we need to scan your project. In order to do so, you need to run the following commands in your second terminal:
mono <path to Sonar>/sonar-scanner-msbuild-4.0.0.731/MSBuild.SonarQube.Runner.exe begin /k:"COM.YOGI.AWESOME.APP"
MSbuild /t:rebuild
mono <path to Sonar>/sonar-scanner-msbuild-4.0.0.731/MSBuild.SonarQube.Runner.exe end
The first command simply starts the sonar-scanner for our project, then we need to rebuild the project and later we can end sonar-scanner. If the scanning is done, you can again open http://localhost:9000 and your project should be there.
What is worth mentioning is that you can begin sonar with more arguments. The only one needed is /k:{Project-key}
You can begin sonar with the following:
- /d:sonar.login=”TOKEN” – to authenticate the scan,
- /n:”APP NAME” – “Specifies the name of the analyzed project in SonarQube. Adding this argument will overwrite the project name in SonarQube if it already exists.”
- /v:”1.0″ – version of the app. This is good to have if you want to have a history of scans.
Furthermore, you might want to ask what is “path to Sonar”. And that’s a good question. This is a relative path to the folder where you have unzipped the sonar. Maybe it will be better to show it by example. My begin sonar command looks like this:
mono ~/Documents/Coding/sonar-scanner-msbuild-4.4.2.1543-net46/SonarScanner.MSBuild.exe begin /k:"MyAwesomeApp"Process automation
Requirements:
- installed sonar,
- installed sonar-scanner
- sonar-runner is downloaded & unzipped
As you can see in the code, the script starts SonarQube.Runner, rebuilds the solution & ends the runner. When done it opens the localhost on port 9000 (default Sonar port). What’s more, for PROJECT-KEY I’m using the solution name without .sln extension – eg. project-key for MyAwesomeApp.sln would be MyAwesomeApp
Usage
1. open the script in a text editor & provide the path to sonnar-runner (line 21 & 27). Like this:

2. In the terminal, open the folder where you have the script. Run the script by typing
./runSonar <path-to-your-project>
eg. ./runSonar Documents/Coding/Personal/MyApp.
Adding script to VS4Mac as an external tool
If you want to add sonar as an external tool, go to your Visual Studio for Mac preferences and under External Tools add the following:
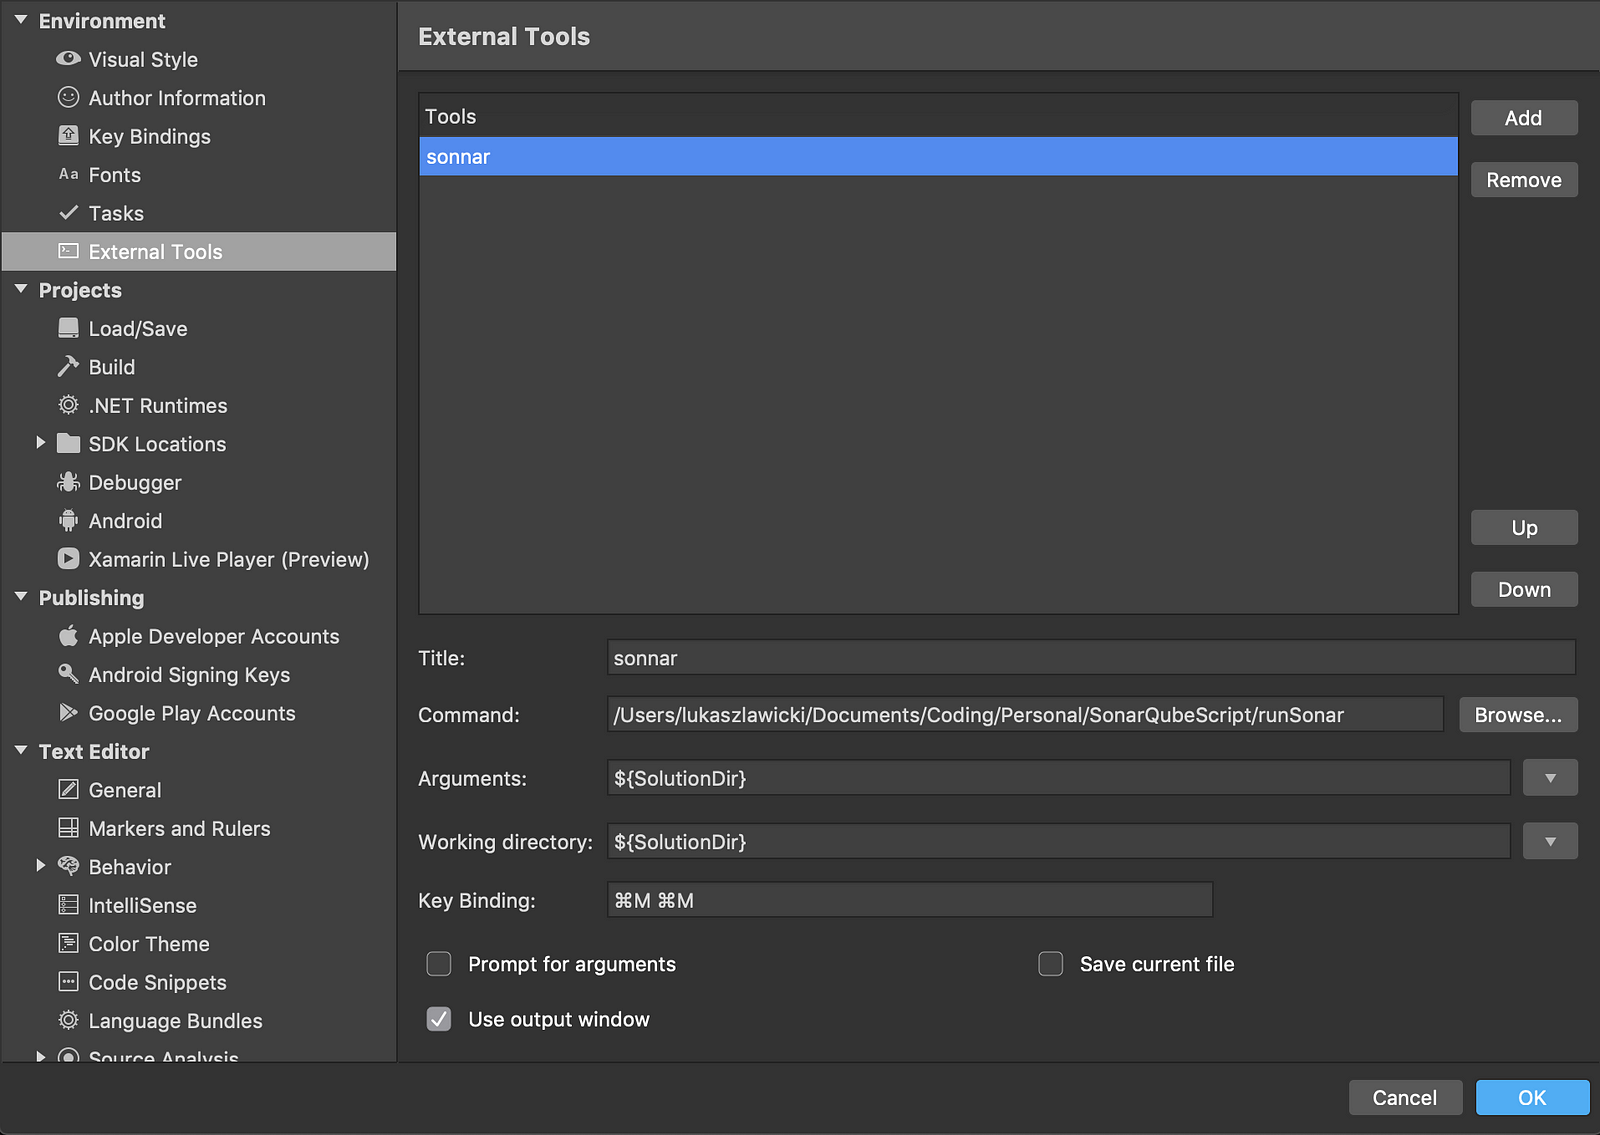
- Title: name it however you want,
- Command: show the VS where the script is,
- Arguments: we still need the path to the .sln file so provide it,
- Working directory: just change it to the same one as in the previous step,
- Key binding: up to you.
Conclusion
I believe that sonar is a must when developing new apps/features. It can really check what you are doing & if you haven’t already done it in other classes. I was struggling with it for a while, but right now, when it is in my Visual Studio for Mac, I can’t imagine coding without it. I strongly suggest you should at least give it a try!
feature image taken from https://www.sonarqube.org/
first of all very nice article and it is 2020 and still no SonarQube in VS for mac 🙁
second, I was wondering if this still works with the latest version of VS for Mac and also if we can use it with an already working server of sonarQube, because from what I understand in this article you need to start your own soar, but what about if you already have a sonar server ?
Thanks, Sergiu for your comment! Unfortunately, it’s been sometime after the last time I used sonarQube within VS4Mac, so I don’t know if it still works. I will check it in spare time and I will let you know. Regarding second part of the question, the answer is that I don’t have experience with “already working sonarQube servers”. Sorry!
cool, thank you for the fast answer, I will try to investigate further to see if I can get the server rules to the local machine or see if a connection is possible directly to the server.
Cheers!